Optimizing a Flask API microservice with Kubernetes
👇🏾 Click on the button to access the code repository
Background of the problem statement:
A popular payment application, EasyPay where users add money to their wallet accounts, faces an issue in its payment success rate. The timeout that occurs with the connectivity of the database has been the reason for the issue.
While troubleshooting, it is found that the database server has several downtime instances at irregular intervals. This situation compels the company to create its own infrastructure that runs in high-availability mode.
Given that online shopping experiences continue to evolve as per customer expectations, the developers are driven to make their app more reliable, fast, and secure for improving the performance of the current system.
Create Ansible host Virtual Machine
We will create our development environment inside a local virtual machine. The logical design is easy to follow if you prefer using a public cloud such as AWS, Azure, GCP, or Digital Ocean. The vagrantfile seen below uses an Ubuntu 20.04 base image provided by the Bento project. We’ll create a single VM on the local device (i.e., laptop) in VirtualBox via Vagrant. You can set the network as either “private” or “public” if the ports are forwarded when testing Docker images locally.
# -*- mode: ruby -*-
# vi: set ft=ruby :

# All Vagrant configuration is done below. The "2" in Vagrant.configure
# configures the configuration version (we support older styles for
# backwards compatibility). Please don't change it unless you know what
# you're doing.
Vagrant.configure("2") do |config|
  # The most common configuration options are documented and commented below.
  # For a complete reference, please see the online documentation at
  # https://docs.vagrantup.com.

  # Every Vagrant development environment requires a box. You can search for
  # boxes at https://vagrantcloud.com/search.
  config.vm.box = "bento/ubuntu-20.04"
  config.vm.hostname = "ansible-controller"
  config.vm.network "public_network", ip: "192.168.1.100"
  config.vm.network "forwarded_port", guest: 80, host: 8080, auto_correct: true
  config.vm.provider "virtualbox" do |vb|
  vb.customize ['modifyvm', :id, '--cableconnected1', 'on']
  end
Install the pre-requisites from the Ansible-KOPS repository
The purpose of this repository is to provide a Kubernetes cluster in a Public Cloud. The deployment of the cluster is fully automated and managed by multiple tools such as Ansible or Kops. It follows the Best Practices of Docker, Kubernetes, AWS, and Ansible as much as possible.
Required Tools
- kOps - kOps is an official Kubernetes project for managing production-grade Kubernetes clusters to Amazon Web Services.
- kubectl - kubectl is a command-line tool for controlling Kubernetes clusters.
- Ansible - Ansible is a radically simple IT automation platform that makes your applications and systems easier to deploy.
- Docker - Docker is a set of platform as a service (PaaS) products that use OS-level virtualization to deliver software in packages called containers.
- Helm - Helm is a tool for managing Charts. Charts are packages of pre-configured Kubernetes resources.
Prerequisites
- An AWS account
- AWS CLI v2
- Ansible
- Boto3 library
- Docker
- Docker Compose
- A registered domain
- Certbot
Kubernetes add-ons
- Kube2IAM - kube2iam provides different AWS IAM roles for pods running on Kubernetes
- External-DNS - Configure external DNS servers (AWS Route53, Google CloudDNS, and others) for Kubernetes Ingresses and Services.
- Ingress NGINX - Ingress-nginx is an Ingress controller for Kubernetes using NGINX as a reverse proxy and load balancer.
- Cert-manager - Automatically provision and manage TLS certificates in Kubernetes.
$ vagrant up && vagrant ssh
Once inside the virtual machine, clone down the ansible-kops repo and set up the environment with the install_prereqs.sh.
$ git clone https://github.com/ctg123/ansible-kops.git
$ cd ansible-kops
$ chmod +x install_prereqs.sh
$ ./install_prereqs.sh
You may need to reboot the machine for all the commands to appear. Once finished, check the following commands to verify that AWS CLI, Docker, and Ansible are correctly installed.
$ aws --version

aws-cli/2.2.29 Python/3.8.8 Linux/5.4.0-58-generic exe/x86_64.ubuntu.20 prompt/off

$ docker version

Client: Docker Engine - Community
 Version:           20.10.8
 API version:       1.41
 Go version:        go1.16.6
 Git commit:        3967b7d
 Built:             Fri Jul 30 19:54:27 2021
 OS/Arch:           linux/amd64
 Context:           default
 Experimental:      true

Server: Docker Engine - Community
 Engine:
  Version:          20.10.8
  API version:      1.41 (minimum version 1.12)
  Go version:       go1.16.6
  Git commit:       75249d8
  Built:            Fri Jul 30 19:52:33 2021
  OS/Arch:          linux/amd64
  Experimental:     false
 containerd:
  Version:          1.4.9
  GitCommit:        e25210fe30a0a703442421b0f60afac609f950a3
 runc:
  Version:          1.0.1
  GitCommit:        v1.0.1-0-g4144b63
 docker-init:
  Version:          0.19.0
  GitCommit:        de40ad0

$ docker-compose version

docker-compose version 1.27.4, build 40524192
docker-py version: 4.3.1
CPython version: 3.7.7
OpenSSL version: OpenSSL 1.1.0l  10 Sep 2019

$ ansible --version

ansible [core 2.11.3]
  config file = None
  configured module search path = ['/home/vagrant/.ansible/plugins/modules', '/usr/share/ansible/plugins/modules']
  ansible python module location = /home/vagrant/.local/lib/python3.8/site-packages/ansible
  ansible collection location = /home/vagrant/.ansible/collections:/usr/share/ansible/collections
  executable location = /home/vagrant/.local/bin/ansible
  python version = 3.8.10 (default, Jun  2 2021, 10:49:15) [GCC 9.4.0]
  jinja version = 3.0.1
  libyaml = True
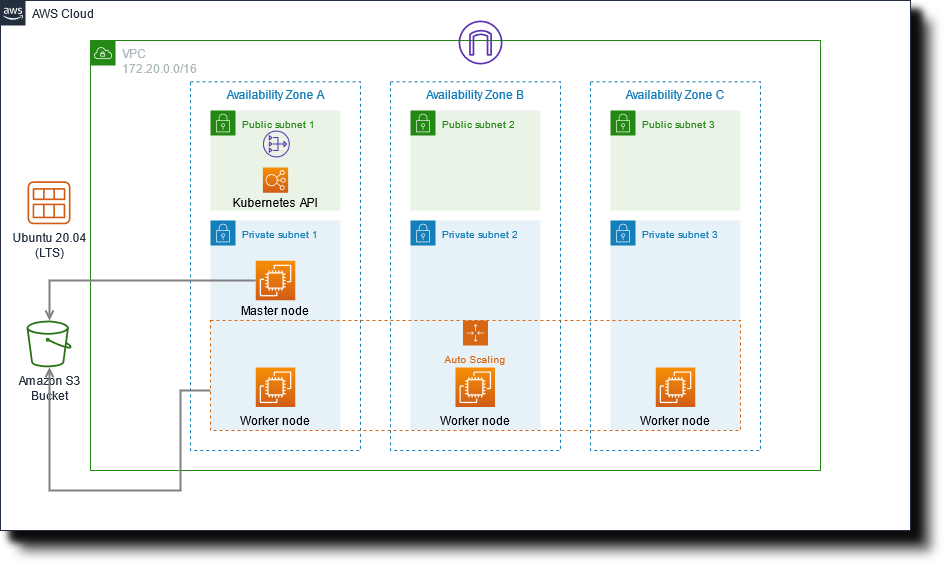
Environment Setup
The ansible packages for Kops & Kubectl are compatible with Linux-AMD64 and Darwin-AMD64 architectures. The following diagram is a visual representation of the infrastructure we will deploy to AWS.
AWS account
For the Kubernetes to be fully operational, you need to create an IAM user for your AWS account with the following permissions:
- AmazonEC2FullAccess
- AmazonRouteS3FullAccess
- AmazonS3FullAccess
- IAMFullAccess
Once you have all the permissions, run the following command. Enter your AWS user credentials and select the region you will use in your environment.
$ aws configure

# Optionally you can specify the AWS Profile
$ aws configure --profile <profile_name>

# You will be prompted for your access keys
AWS Access Key ID [None]: AKIA************
AWS Secret Access Key [None]: kCcT****************
Default region name [None]: us-east-1
Default output format [None]: json
Register your Domain
You must own a registered domain to complete the Kubernetes cluster deployment by using either method(s) seen below
New Domain: Register a new domain using AWS Route53.
Existing Domain: Create a subdomain without migrating the parent domain.
- Create a hosted zone for your subdomain(example.mydomain.com.)
- Take note of your NS record.
- Log into your domain registrar account.
- Create the corresponding NS record to let your domain know that your subdomain is hosted on AWS.
DOMAIN                   TTL       TYPE                     TARGET
example.mydomain.com.      0         NS      ns-xxxx.awsdns-xx.org
example.mydomain.com.      0         NS      ns-yyy.awsdns-yy.org
...
Certbot
We’ll use the Route53 DNS plugin for Certbot. This plugin automates completing a DNS-01 challenge (DNS01) by creating and subsequently removing TXT records using the Amazon Web Services Route 53 API. My example is for my registered domain. To initiate a DNS challenge, please execute the following command:
$ python3 -m pip install certbot-dns-route53 --user

$ certbot certonly --dns-route53 -d ctgkube.com \
--config-dir ~/.config/letsencrypt \
--logs-dir /tmp/letsencrypt \
--work-dir /tmp/letsencrypt \
--dns-route53-propagation-seconds 30
Environment variables
You will find all of the environment variables in the group_vars directory.
group_vars/all.ymlcontains the global environment variables.
#####################
# ~~ Domain name ~~ #
cluster_name: ctgkube.com

##########################
# ~~ Kops state store ~~ #
bucket_name: ctgadget-kops-store

###############################################
# ~~ SSH public key to access Kubernetes API ~~#
# Enter the full path with the name of the SSH public key created by the generate-ssh-key.yml file.
ssh_pub_key: ~/.ssh/ctgkube.pub

########################################
# ~~ AWS environment for kubernetes ~~ #

# Match with your AWS profile in case of multi-account environment
aws_profile: default
aws_region: us-east-1

# Be careful, master_zones must match maser_node_count
# Example: can't have 1 master in 2 AWS availability zones
master_zones: us-east-1a
aws_zones: us-east-1a,us-east-1b,us-east-1c

# EC2 host sizing
# (Ubuntu 20.04 LTS)
base_image: ami-019212a8baeffb0fa

# Kubernetes master nodes
master_instance_type: t3.medium
master_node_count: 1

# Kubernetes worker nodes
worker_instance_type: t3.medium
worker_node_count: 3

############################################
# ~~ Let's encrypt domain's email owner ~~ #
email_owner: chaance.graves@ctginnovations.io
Generate the SSH Keys and deploy the cluster
When the environment and the pre-requisites configures, run the following playbooks with Ansible. The generate-ssh-key.yml will create the SSH key pair to access Kubernetes API, which you can use to log in to the master node with.
Once generated, make sure the path matches the variable specified in the group_vars directory. You’re now ready to run the deploy-cluster.yml playbook!
$ ansible-playbook generate-ssh-key.yml
$ ansible-playbook deploy-cluster.yml --ask-become-pass
It should take approximately 8 - 10 minutes to complete.

Install Kubernetes Dashboard
A critical feature for any Kubernetes cluster is efficient monitoring of all resources with an accessible UI. The Kubernetes dashboard enables the ability to deploy containerized applications, troubleshoot pods, and manage other cluster resources such as scaling a deployment, initiating rolling updates, resetting pods instead of using the kubectl command.
Run the deploy_dashboard.sh to pull from the latest version of the Kubernetes dashboard stored in the official Github repo. You can check at this link to see which version is the latest release and update the script accordingly.
Once complete, the default service type configures as a ClusterIP. We will change this to LoadBalancer to access it externally. You can find the service type and edit it with the following command:
$ kubectl -n kubernetes-dashboard edit svc kubernetes-dashboard
Make sure the service type changed to LoadBalancer successfully. You should get an AWS ELB address as an output.
$ kubectl -n kubernetes-dashboard get svc
NAME                        TYPE           CLUSTER-IP      EXTERNAL-IP                                                               PORT(S)         AGE
dashboard-metrics-scraper   ClusterIP      100.67.72.147   <none>                                                                    8000/TCP        5h20m
kubernetes-dashboard        LoadBalancer   100.69.145.80   a6c1db00d3d9d42659150be7771c2ba5-1256148891.us-east-1.elb.amazonaws.com   443:31463/TCP   5h20m
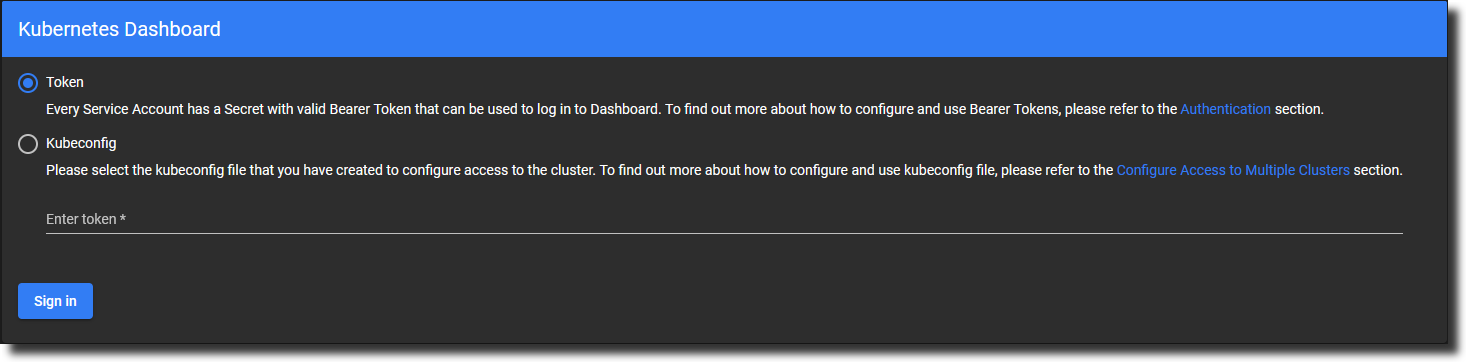
An output of the script produced a security token needed to log in. Copy the token and enter it in the dashboard. You will then sign into the Kubernetes dashboard. You can retrieve the token when needed with this command:
$ kubectl get secret $(kubectl get serviceaccount dashboard -o jsonpath="{.secrets[0].name}") -o jsonpath="{.data.token}" | base64 --decode

Deploy Flask API + MongoDB app on Kubernetes
We will develop a simple Python Flask API application, which will communicate to a MongoDB database, containerize it using Docker, and deploy it to the Kubernetes cluster.
Prerequisites for development on a local machine
Install the following python libraries using pip located in the requirements.txt file in the payment-app directory. You will have Flask running locally on your machine prior to deploying the Docker image to Kubernetes.
$ cd ansible-kops/payment-app
$ python3 -m pip install -r requirements.txt --user
$ pip list
Creating the Flask Payment application
We’ll produce a simple RESTful API to create, read, update, and delete (CRUD) payment entries. The app will store the data in a MongoDB database, an open-source database that stores flexible JSON-like documents that is Non-relational (often called NoSQL databases).
By default, when a MongoDB Server instance starts on a machine, it listens to port 27017. The Flask-PyMongo module helps us to bridge Flask and MongoDB and provides some convenience helpers. An objectId module is a tool for working with MongoDB ObjectId, the default value of _id field of each document, generated during the creation of any document.
The app.py which can run on any host (python app.py), can be accessed at http://localhost:5000/.
from flask import Flask, request, jsonify
from flask_pymongo import PyMongo
from bson.objectid import ObjectId
from flask_cors import CORS
import socket

# Configuration
DEBUG = True

# Instantiate the app
app = Flask(__name__)
app.config["MONGO_URI"] = "mongodb://mongo:27017/dev"
app.config['JSONIFY_PRETTYPRINT_REGULAR'] = True
mongo = PyMongo(app)
db = mongo.db

# enable CORS
CORS(app, resources={r'/*': {'origins': '*'}})

# UI message to show which pods the Payment API container is running
@app.route("/")
def index():
    hostname = socket.gethostname()
    return jsonify(
        message="Welcome to the EasyPay app. I am running inside the {} pod!".format(hostname)
    )

@app.route("/payments")
def get_all_payments():
    payments = db.payment.find()
    data = []
    for payment in payments:
        item = {
            "id": str(payment["_id"]),
            "payment": payment["payment"]
        }
        data.append(item)
    return jsonify(
        data=data
    )

# POST Method to collect a user's payment
@app.route("/payments", methods=["POST"])
def add_payment():
    data = request.get_json(force=True)
    db.payment.insert_one({"payment": data["payment"]})
    return jsonify(
        message="Payment saved successfully to your account!"
    )

# PUT Method to update a user's payment
@app.route("/payments/<id>", methods=["PUT"])
def update_payment(id):
    data = request.get_json(force=True)["payment"]
    response = db.payment.update_one({"_id": ObjectId(id)}, {"$set": {"payment": data}})
    if response.matched_count:
        message = "Payment updated successfully!"
    else:
        message = "No Payments were found!"
    return jsonify(
        message=message
    )

# DELETE Method to delete a user's payment
@app.route("/payments/<id>", methods=["DELETE"])
def delete_payment(id):
    response = db.payment.delete_one({"_id": ObjectId(id)})
    if response.deleted_count:
        message = "Payment deleted successfully!"
    else:
        message = "No Payments were found!"
    return jsonify(
        message=message
    )

# POST Method to delet all payment data
@app.route("/payments/delete", methods=["POST"])
def delete_all_payments():
    db.payment.remove()
    return jsonify(
        message="All Payments deleted!"
    )

# The app server will be able to run locally at port 5000
if __name__ == "__main__":
    app.run(host="0.0.0.0", port=5000)
We first import all the required modules and create instances of the Flask class (the app) and the PyMongo class (the database). Note that the hostname in the MONGO_URI Flask configuration variable defines the mongo instead of localhost. Mongo will be the name of our database container, and containers in the same Docker network can talk to each other by their names.
Our app consists of six functions which are assigned URLs by @app.route() Python decorator. At first glance, it is easy to understand that the decorator is telling our app to execute the underlying function whenever a user visits our @app domain at the given route().
index()- displays a welcome message for the app. It Also displays the hostname of the machine where our app is running. This is useful to understand that we will be hitting a random pod each time we try to access our app on Kubernetes.get_all_payments()- displays all the payments that are available in the database as a list of dictionaries.add_payment()- adds a new payment that is stored in the database with a unique ID.update_payment(id)- modifies any existing payment entry. If no payment data is found with the queried ID, the appropriate message is returned.delete_payment(id)- removes that entry of the task having the queried ID from the database. Returns appropriate message if no task with the specified ID is found.delete_all_payments()- removes all the payment data and returns an empty list.
In the final section, where we run the app, we define the host parameter as ‘0.0.0.0’ to make the server publicly available, running on the machine’s IP address, which will be inside a unique container.
Containerizing the application
Once you have Docker installed locally, we will store our images to Docker Hub. Use the docker login command to authorize Docker to connect to your Docker Hub account.
Let’s build a Docker image of the app to push to the Docker Hub registry. In the directory payment-app, a Dockerfile with the following contents to create the image:
######################################
# ~~ DOCKERFILE for Flask API app ~~ #
######################################

FROM python:alpine3.9
COPY . /app
WORKDIR /app
RUN pip install -r requirements.txt
ENV PORT 5000
EXPOSE 5000
ENTRYPOINT [ "python" ]
CMD [ "app.py" ]
We are using the official Python3.9 image, based on the Alpine Linux project, as the base image and copying our working directory’s contents to a new directory on the image. We are instructing the image to expose the port 5000 when run as a container, on which we can access our app. Finally, our app container configures to run python app.py automatically when deployed to a pod.
Here, we build our image with the tag <username>/<image-name>:<version> format using the below command:
$ docker build -t ctgraves16/paymentapp-python:1.0.0 .
and then push it to the Docker Hub registry. It will be publicly available where anyone in the world can download and run it:
$ docker push ctgraves16/paymentapp-python:1.0.0
👉🏾 NOTE: Ensure to replace “ctgraves16” with your Docker Hub username.
Now that we containerized the app, what about the database? How can we containerize that? We don’t have to worry about it as we can easily use the official mongo Docker image and run it on the same network as the app container.
Run the below commands to test the image locally where it can be accessible at http://localhost:5000/
$ docker network create payment-app-net
$ docker run --name=mongo --rm -d --network=payment-app-net mongo
$ docker run --name=paymentapp-python --rm -p 5000:5000 -d --network=payment-app-net ctgraves16/paymentapp-python:1.0.0

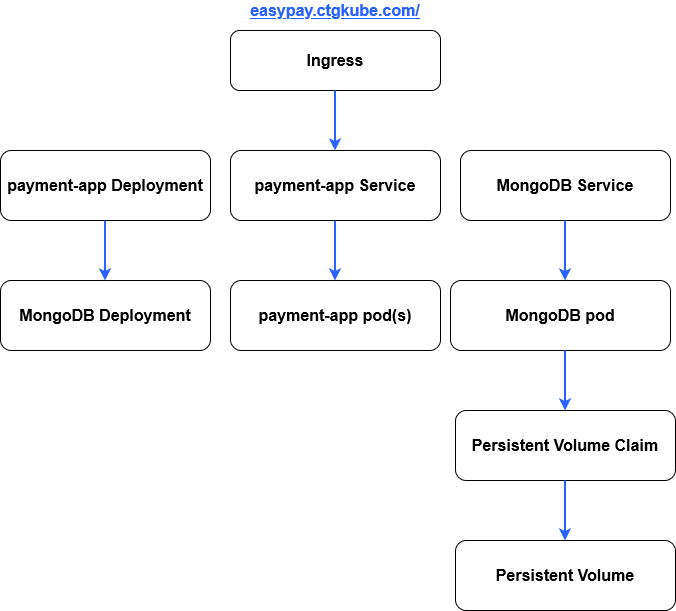
Deploy the application and MongoDB database to Kubernetes
We can check on how the nodes are set up by running kubectl get nodes.
~/ansible-kops$ kubectl get nodes
NAME                             STATUS   ROLES                  AGE   VERSION
ip-172-20-125-204.ec2.internal   Ready    node                   17h   v1.21.3
ip-172-20-42-157.ec2.internal    Ready    control-plane,master   17h   v1.21.3
ip-172-20-50-137.ec2.internal    Ready    node                   17h   v1.21.3
ip-172-20-81-89.ec2.internal     Ready    node                   17h   v1.21.3
The deploy.sh script automates all the steps for setting up the deployments and services. The deployment of the resources are in the following order:
mongo-pv.ymlPersistent Volume:
The mongo-pv.yml file creates a storage volume of 256 MB to be made available to the mongo container. The contents of this volume persist, even if the MongoDB pod is deleted or moved to a different node.
apiVersion: v1
kind: PersistentVolume
metadata:
  name: mongo-pv
  labels:
    type: local
spec:
  capacity:
    storage: 256Mi
  storageClassName: default
  accessModes:
    - ReadWriteOnce
  hostPath:
    path: /tmp/db
We’ll use a local path /tmp/db on the host as the disk path for simplicity.
👉🏾 NOTE: Both PVC and PV must have the same class, otherwise, a PVC will not find a PV, and STATUS of such a PVC will be Pending.
$ kubectl get storageclass -o wide
NAME                      PROVISIONER             RECLAIMPOLICY   VOLUMEBINDINGMODE      ALLOWVOLUMEEXPANSION   AGE
default                   kubernetes.io/aws-ebs   Delete          Immediate              false                  17h
gp2                       kubernetes.io/aws-ebs   Delete          Immediate              false                  17h
kops-ssd-1-17 (default)   kubernetes.io/aws-ebs   Delete          WaitForFirstConsumer   true                   17h
mongo-pvcPersistent Volume Claim:
The mongo-pvc.yml file claims the storage create above and mounts onto the mongo container. Kops creates a default StorageClass set where our PVC will reside.
apiVersion: v1
kind: PersistentVolumeClaim
metadata:
  name: mongo-pvc
spec:
  accessModes:
    - ReadWriteOnce
  resources:
    requests:
      storage: 256Mi
The Persistent Volume Claim will show that the volume status is now changed to Bound when the scripts are complete.
$ kubectl get pv && kubectl get pvc
NAME                                       CAPACITY   ACCESS MODES   RECLAIM POLICY   STATUS      CLAIM               STORAGECLASS    REASON   AGE
mongo-pv                                   256Mi      RWO            Retain           Available                       default                  17h
pvc-ee7ae28d-a7ad-478e-ba5f-038aa830b1b2   1Gi        RWO            Delete           Bound       default/mongo-pvc   kops-ssd-1-17            17h
NAME        STATUS   VOLUME                                     CAPACITY   ACCESS MODES   STORAGECLASS    AGE
mongo-pvc   Bound    pvc-ee7ae28d-a7ad-478e-ba5f-038aa830b1b2   1Gi        RWO            kops-ssd-1-17   17h
mongoDeployment:
The mongo-deployment.yml file is where we define the mongo deployment that creates a single instance of a MongoDB database. Here, we’ll expose the native port 27017, which other pods can access. The persistent volume will then proceed to mount onto a directory inside the container.
apiVersion: apps/v1
kind: Deployment
metadata:
  name: mongo
spec:
  selector:
    matchLabels:
      app: mongo
  template:
    metadata:
      labels:
        app: mongo
    spec:
      containers:
        - name: mongo
          image: mongo
          ports:
            - containerPort: 27017
          volumeMounts:
            - name: storage
              mountPath: /data/db
      volumes:
        - name: storage
          persistentVolumeClaim:
            claimName: mongo-pvc
mongoService:
This service, defined by mongo-svc.yml, is set as a ClusterIP (default type of Service in Kubernetes). This service makes the mongo pod accessible from within the cluster but not from outside. The only resource that should have access to the MongoDB database is the payment app.
apiVersion: v1
kind: Service
metadata:
  name: mongo
spec:
  selector:
    app: mongo
  ports:
    - port: 27017
payment-appDeployment:
The payment-app-deployment.yml file defines the deployment of our app running in a pod on any worker node. The spec section defines the pod where we specify the image to be pulled and run. Port 5000 of the pod is exposed.
apiVersion: apps/v1
kind: Deployment
metadata:
  name: payment-app
  labels:
    app: payment-app
spec:
  replicas: 1
  selector:
    matchLabels:
      app: payment-app
  template:
    metadata:
      labels:
        app: payment-app
    spec:
      containers:
        - name: payment-app
          image: ctgraves16/paymentapp-python:1.0.0
          ports:
            - containerPort: 5000
          imagePullPolicy: Always
payment-appLoad Balancer Service:
The LoadBalancer Service enables the pods in a deployment to be accessible from outside the cluster. Here, since we are using a custom Kubernetes cluster, we will be accessing the app from the master node at <service-ip>:<service-port>. The payment-app-svc.yml file defines this service. The advantage of using a Service is that it gives us a single consistent IP to access our app as many pods may come and go in our deployment.
apiVersion: v1
kind: Service
metadata:
  name: payment-app-svc
spec:
  selector:
    app: payment-app
  ports:
    - port: 8080
      targetPort: 5000
  type: LoadBalancer
Here, port 8080 of the service payment-app-svc is bound to port 5000 of the pods attached.
$ kubectl get svc payment-app-svc
NAME              TYPE           CLUSTER-IP      EXTERNAL-IP                                                               PORT(S)          AGE
payment-app-svc   LoadBalancer   100.66.62.244   ac0a73109d80b449d8b2094246ab3e18-1598075260.us-east-1.elb.amazonaws.com   8080:30164/TCP   17h
We are now able to access the payment app at the ELB address:
vagrant@ansible-controller:~/ansible-kops/kubernetes$ curl http://ac0a73109d80b449d8b2094246ab3e18-1598075260.us-east-1.elb.amazonaws.com:8080
{
  "message": "Welcome to the EasyPay app. I am running inside the payment-app-99695c66b-dv776 pod!"
}
vagrant@ansible-controller:~/ansible-kops/kubernetes$ curl http://ac0a73109d80b449d8b2094246ab3e18-1598075260.us-east-1.elb.amazonaws.com:8080
{
  "message": "Welcome to the EasyPay app. I am running inside the payment-app-99695c66b-2bk98 pod!"
}
vagrant@ansible-controller:~/ansible-kops/kubernetes$ curl http://ac0a73109d80b449d8b2094246ab3e18-1598075260.us-east-1.elb.amazonaws.com:8080
{
  "message": "Welcome to the EasyPay app. I am running inside the payment-app-99695c66b-dv776 pod!"
}
vagrant@ansible-controller:~/ansible-kops/kubernetes$ curl http://ac0a73109d80b449d8b2094246ab3e18-1598075260.us-east-1.elb.amazonaws.com:8080
{
  "message": "Welcome to the EasyPay app. I am running inside the payment-app-99695c66b-6n4kg pod!"
}
We can see that the LoadBalancer sends the traffic to any random pod each time we try to access our app.
payment-appIngress
The Ingress service allows external interfaces with the payment app using a single load balancer provided by the NGINX Ingress Controller created when Ansible deployed the Helm chart onto the cluster. We will create a domain name at easypay.ctgkube.com.
---
apiVersion: networking.k8s.io/v1
kind: Ingress
metadata:
  name: payment-app-ingress
  annotations:
spec:
  rules:
  - host: easypay.ctgkube.com
    http:
      paths:
      - path: /
        pathType: Prefix
        backend:
          service:
            name: payment-app-svc
            port:
              number: 8080
👉🏾 NOTE: The Ingress resource defines rules that redirect anything for easypay.ctgkube.com to payment-app-svc. Any request that doesn’t match the rule returns a 404 “Not Found” error message.
If we describe the Ingress, you’ll receive a message similar to the following:
$ kubectl describe ingress
Name:             payment-app-ingress
Namespace:        default
Address:          ab58e1ce3541e475f8365c9ddfcd4496-883895960.us-east-1.elb.amazonaws.com
Default backend:  default-http-backend:80 (<error: endpoints "default-http-backend" not found>)
Rules:
  Host                 Path  Backends
  ----                 ----  --------
  easypay.ctgkube.com
                       /   payment-app-svc:8080 (100.117.243.5:5000,100.125.236.198:5000,100.125.236.199:5000)
Annotations:           <none>
Events:                <none>
You can test the NGINX Ingress Controller using the DNS URL of the ELB load balancer:
$ curl -I http://ab58e1ce3xxxxxxx-8xxxx960.us-east-1.elb.amazonaws.com/
HTTP/1.1 404 Not Found
Date: Sat, 21 Aug 2021 21:11:28 GMT
Content-Type: text/html
Content-Length: 146
Connection: keep-alive
The default server returns a “Not Found” page with a 404 status code for all the requests for domains where no Ingress rules are defined. Based on the prescribed rules, the Ingress Controller doesn’t divert traffic to the specified backend service unless the request matches the configuration. Because the host field configures for the Ingress object, you must supply the Host header of the request with the same hostname.
$ curl -I -H "Host: easypay.ctgkube.com" http://ab58e1ce3541e475f8365c9ddfcd4496-883895960.us-east-1.elb.amazonaws.com/
HTTP/1.1 200 OK
Date: Sat, 21 Aug 2021 21:17:46 GMT
Content-Type: application/json
Content-Length: 104
Connection: keep-alive
Access-Control-Allow-Origin: *
payment-appHorizontal Pod Autoscaler
One of the design requirements is to enable the cluster to scale up whenever the CPU utilization exceeds 50%. An HPA resource is at the pod level, and it scales the pods in a deployment or replica set. It implements as a Kubernetes API resource and a controller. The controller manager queries the resource utilization against the metrics specified in each HorizontalPodAutoscaler definition. It obtains the metrics from either the resource metrics API (for per-pod resource metrics) or the custom metrics API (for all other metrics).
apiVersion: autoscaling/v1
kind: HorizontalPodAutoscaler
metadata:
  name: payment-app-hpa
spec:
  maxReplicas: 10
  minReplicas: 3
  scaleTargetRef:
    apiVersion: apps/v1
    kind: Deployment
    name: payment-app
  targetCPUUtilizationPercentage: 50
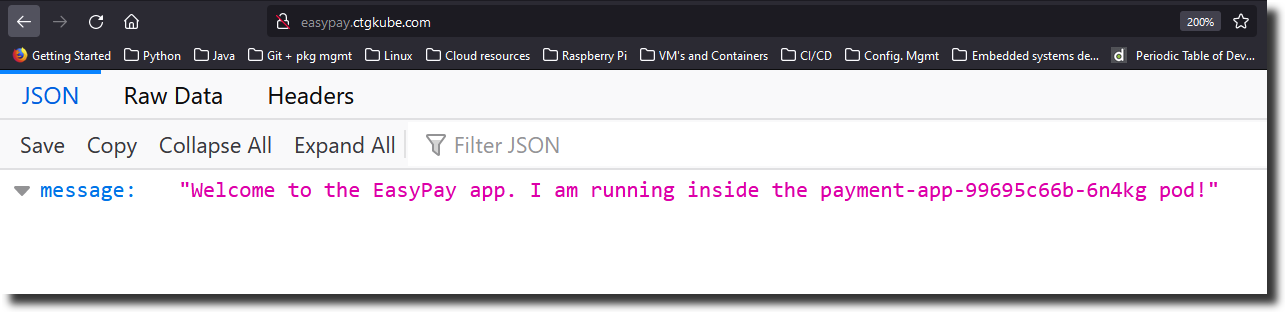
Now that the complete application setup is ready, we can interact with the Flask app at easypay.ctgkube.com.
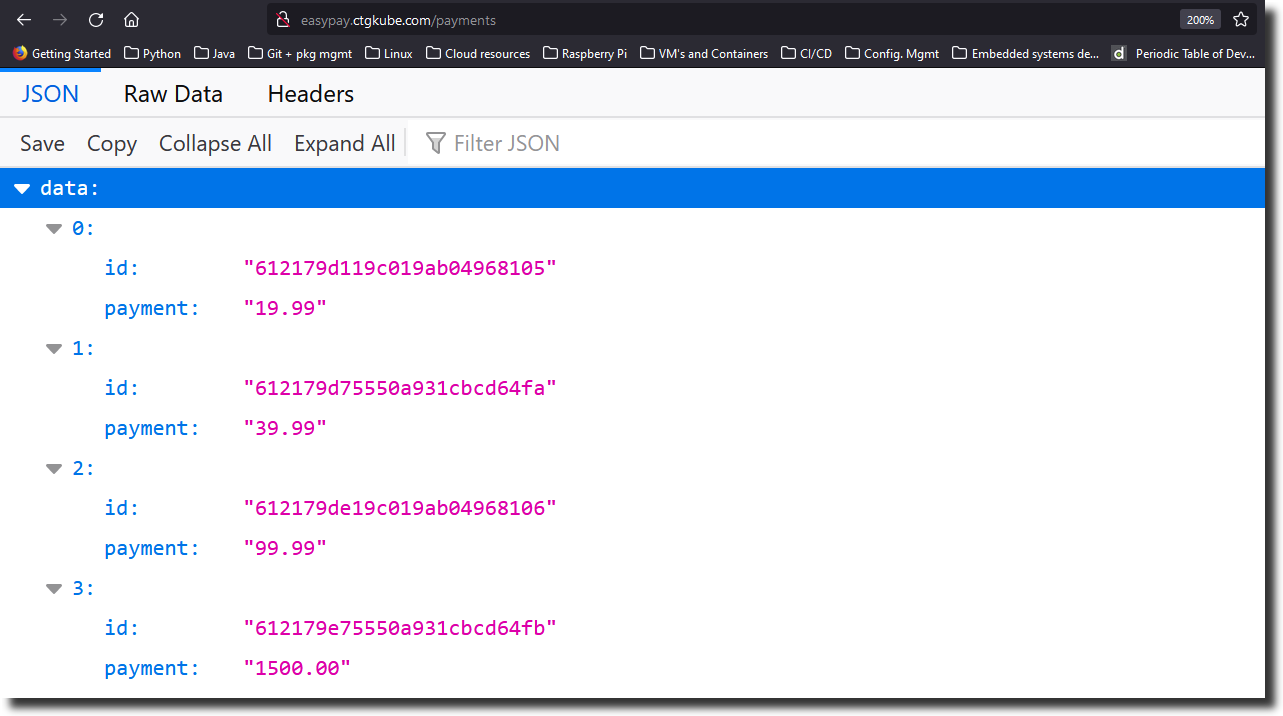
We can try all the API methods specified in the app to interact with the data from the command line.
$ curl http://easypay.ctgkube.com
{
  "message": "Welcome to the EasyPay app. I am running inside the payment-app-99695c66b-dv776 pod!"
}

$ curl http://easypay.ctgkube.com/payments
{
  "data": [
    {
      "id": "61207498207b153038b3b0b3",
      "payment": "00.00"
    },
    {
      "id": "612074b5207b153038b3b0b4",
      "payment": "500.00"
    },
    {
      "id": "612074df879dd6b7458ac593",
      "payment": "99.99"
    },
    {
      "id": "61207582879dd6b7458ac594",
      "payment": "199.99"
    }
  ]
}

$ curl -X POST -d "{\"payment\": \"19.99\"}" http://easypay.ctgkube.com/payments
{
  "message": "Payment saved successfully to your account!"
}

$ curl -X DELETE easypay.ctgkube.com/payments/61217595207b153038b3b0b6
{
  "message": "Payment deleted successfully!"
}

$ curl easypay.ctgkube.com/payments
{
  "data": [
    {
      "id": "61206c7864a10df0ec229aca",
      "payment": "29.99"
    },
    {
      "id": "61206c8764a10df0ec229acb",
      "payment": "2000.00"
    },
    {
      "id": "612074b5207b153038b3b0b4",
      "payment": "500.00"
    },
    {
      "id": "61207573207b153038b3b0b5",
      "payment": "99.99"
    },
    {
      "id": "61207582879dd6b7458ac594",
      "payment": "199.99"
    }
  ]
}

$ curl -X POST easypay.ctgkube.com/payments/delete
{
  "message": "All Payments deleted!"
}

$ curl easypay.ctgkube.com/payments
{
  "data": []
}
Installing the Metrics server
Within the ansible-kops repository, we have the metrics server resource files stored in the kubernetes/metrics-server folder. Run the kubectl apply -f. to deploy all the resources at the same time.
~ ansible-kops/kubernetes/metrics-server

$ ls -l
total 32
-rw-rw-r-- 1 vagrant vagrant  410 Aug 19 14:44 aggregated-metrics-reader.yaml
-rw-rw-r-- 1 vagrant vagrant  316 Aug 19 14:44 auth-delegator.yaml
-rw-rw-r-- 1 vagrant vagrant  338 Aug 19 14:44 auth-reader.yaml
-rw-rw-r-- 1 vagrant vagrant  307 Aug 19 14:44 metrics-apiservice.yaml
-rw-rw-r-- 1 vagrant vagrant 1002 Aug 19 14:44 metrics-server-deployment.yaml
-rw-rw-r-- 1 vagrant vagrant  307 Aug 19 14:44 metrics-server-service.yaml
-rw-rw-r-- 1 vagrant vagrant  563 Aug 19 14:44 resource-reader.yaml
-rwxrwxr-x 1 vagrant vagrant  695 Aug 19 14:44 rm-metrics-server.sh

$ kubectl apply -f.
clusterrole.rbac.authorization.k8s.io/system:aggregated-metrics-reader created
clusterrolebinding.rbac.authorization.k8s.io/metrics-server:system:auth-delegator created
rolebinding.rbac.authorization.k8s.io/metrics-server-auth-reader created
Warning: apiregistration.k8s.io/v1beta1 APIService is deprecated in v1.19+, unavailable in v1.22+; use apiregistration.k8s.io/v1 APIService
apiservice.apiregistration.k8s.io/v1beta1.metrics.k8s.io created
serviceaccount/metrics-server created
deployment.apps/metrics-server created
service/metrics-server created
clusterrole.rbac.authorization.k8s.io/system:metrics-server created
clusterrolebinding.rbac.authorization.k8s.io/system:metrics-server created

$ kubectl get pods -n kube-system
NAME                                                      READY   STATUS    RESTARTS   AGE
calico-kube-controllers-78d6f96c7b-c4pjk                  1/1     Running   0          20h
calico-node-4bjcm                                         1/1     Running   0          20h
calico-node-74m42                                         1/1     Running   0          20h
calico-node-gnrh2                                         1/1     Running   0          20h
calico-node-sbfzl                                         1/1     Running   0          20h
coredns-autoscaler-6f594f4c58-k8xpx                       1/1     Running   0          20h
coredns-f45c4bf76-m6d9g                                   1/1     Running   0          20h
coredns-f45c4bf76-tk77l                                   1/1     Running   0          20h
dns-controller-64f8b56bdc-k82kx                           1/1     Running   0          20h
etcd-manager-events-ip-172-20-42-157.ec2.internal         1/1     Running   0          20h
etcd-manager-main-ip-172-20-42-157.ec2.internal           1/1     Running   0          20h
kops-controller-8kp2r                                     1/1     Running   0          20h
kube-apiserver-ip-172-20-42-157.ec2.internal              2/2     Running   1          20h
kube-controller-manager-ip-172-20-42-157.ec2.internal     1/1     Running   0          20h
kube-proxy-ip-172-20-125-204.ec2.internal                 1/1     Running   0          20h
kube-proxy-ip-172-20-42-157.ec2.internal                  1/1     Running   0          20h
kube-proxy-ip-172-20-50-137.ec2.internal                  1/1     Running   0          20h
kube-proxy-ip-172-20-81-89.ec2.internal                   1/1     Running   0          20h
kube-scheduler-ip-172-20-42-157.ec2.internal              1/1     Running   0          20h
kube2iam-9tfsx                                            1/1     Running   0          20h
kube2iam-m8ls4                                            1/1     Running   0          20h
kube2iam-xnp8z                                            1/1     Running   0          20h
metrics-server-6fcb6cbf6f-mrsgl                           1/1     Running   0          19h
nginx-ingress-ingress-nginx-controller-84bf68bdd7-shkj4   1/1     Running   0          20h

$ kubectl get svc -n kube-system
NAME                                               TYPE           CLUSTER-IP       EXTERNAL-IP                                                              PORT(S)                      AGE
kube-dns                                           ClusterIP      100.64.0.10      <none>                                                                   53/UDP,53/TCP,9153/TCP       20h
metrics-server                                     ClusterIP      100.68.52.42     <none>                                                                   443/TCP                      19h
nginx-ingress-ingress-nginx-controller             LoadBalancer   100.64.25.22     ab58e1ce3541e475f8365c9ddfcd4496-883895960.us-east-1.elb.amazonaws.com   80:32111/TCP,443:30841/TCP   20h
nginx-ingress-ingress-nginx-controller-admission   ClusterIP      100.69.127.174   <none>                                                                   443/TCP                      20h
Testing the payment app HPA

Before installing and running an open-source load testing generator to test the payment-app-hpa, let’s run the kubectl describe hpa to see all the conditions affecting the HorizontalPodAutoscaler.
$ kubectl describe hpa
Name:                                                  payment-app-hpa
Namespace:                                             default
Labels:                                                <none>
Annotations:                                           <none>
CreationTimestamp:                                     Sat, 21 Aug 2021 02:54:24 +0000
Reference:                                             Deployment/payment-app
Metrics:                                               ( current / target )
  resource cpu on pods  (as a percentage of request):  1% (1m) / 50%
Min replicas:                                          3
Max replicas:                                          10
Deployment pods:                                       3 current / 3 desired
Conditions:
  Type            Status  Reason            Message
  ----            ------  ------            -------
  AbleToScale     True    ReadyForNewScale  recommended size matches current size
  ScalingActive   True    ValidMetricFound  the HPA was able to successfully calculate a replica count from cpu resource utilization (percentage of request)
  ScalingLimited  True    TooFewReplicas    the desired replica count is less than the minimum replica count
Events:
  Type     Reason                        Age                From                       Message
  ----     ------                        ----               ----                       -------
  Normal   SuccessfulRescale             22m (x2 over 19h)  horizontal-pod-autoscaler  New size: 3; reason: Current number of replicas below Spec.MinReplicas
  Warning  FailedGetResourceMetric       21m (x4 over 22m)  horizontal-pod-autoscaler  failed to get cpu utilization: did not receive metrics for any ready pods
  Warning  FailedComputeMetricsReplicas  21m (x4 over 22m)  horizontal-pod-autoscaler  invalid metrics (1 invalid out of 1), first error is: failed to get cpu utilization: did not receive metrics for any ready pods
Testing the payment application with Load testing tools
For our load testing tool, we will use Apache bench. Apache bench (also called Apache benchmark) is a helpful load testing tool for websites that run on Apache webserver. It is easy to install and allows you to simulate & test different kinds of website loads to enable your website to cope with real-world situations.
For Ubuntu 20.04, the following command will install Apache bench:
sudo apt-get install apache2-utils -y
Once installed, you can directly use it for load testing. Here’s the syntax for Apache bench.
$ ab <OPTIONS> <WEB_SERVER_ADDRESS>/<PATH>
Using the above command, we will specify the address from the easypay-payment-ingress at easypay.ctgkube.com. We will simulate 100,000 requests with 1000 concurrent connections to see how it will scale like it would be if it were in production.
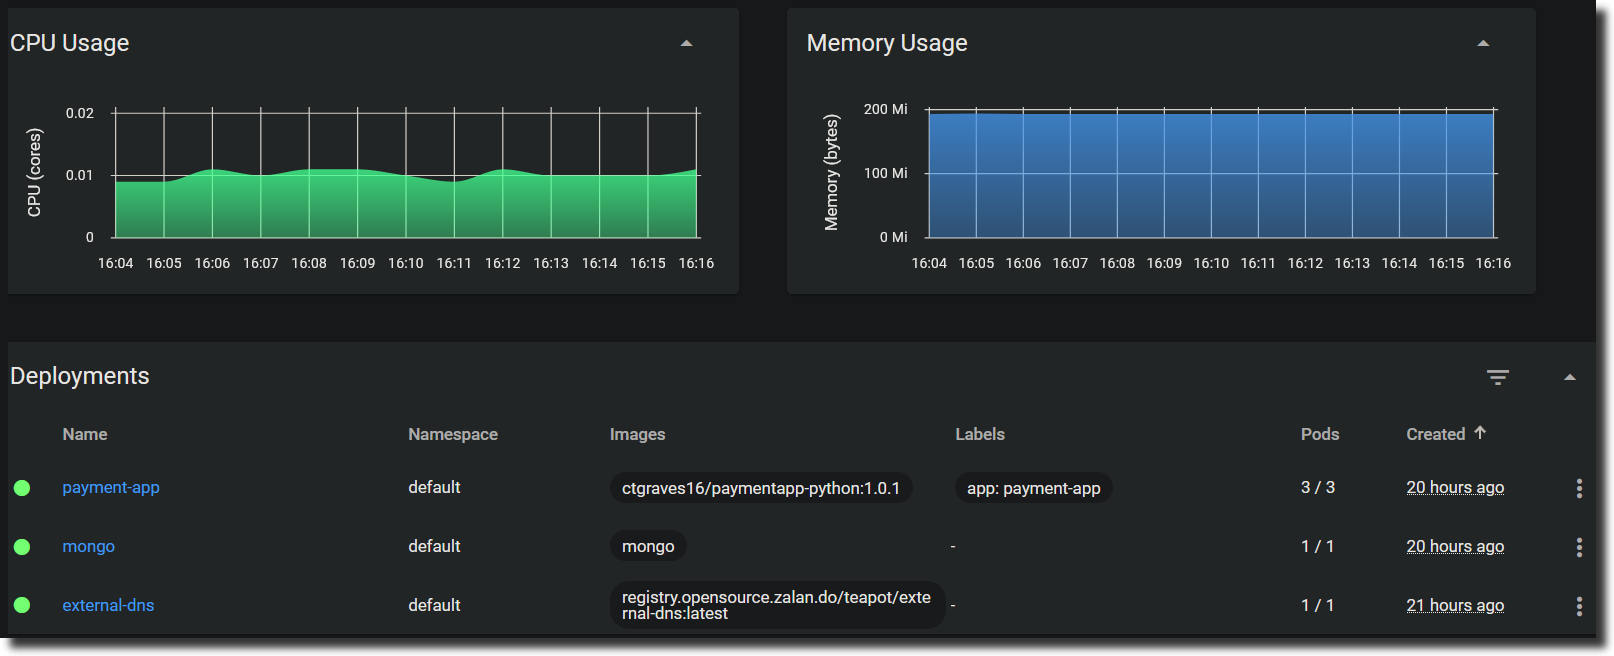
$ kubectl get pods
NAME                            READY   STATUS    RESTARTS   AGE
external-dns-7ff5ccbb48-p8wdd   1/1     Running   0          20h
mongo-786f4cb565-dr62t          1/1     Running   0          19h
payment-app-767748b689-4vl9t    1/1     Running   0          40m
payment-app-767748b689-6vbhw    1/1     Running   0          40m
payment-app-767748b689-pkwnz    1/1     Running   0          40m

$ kubectl top pods --use-protocol-buffers
NAME                            CPU(cores)   MEMORY(bytes)
external-dns-7ff5ccbb48-p8wdd   1m           16Mi
mongo-786f4cb565-dr62t          9m           71Mi
payment-app-767748b689-4vl9t    1m           23Mi
payment-app-767748b689-6vbhw    1m           23Mi
payment-app-767748b689-pkwnz    1m           23Mi

$ ab -n 100000 -c 1000 http://easypay.ctgkube.com/payments
This is ApacheBench, Version 2.3 <$Revision: 1843412 $>
Copyright 1996 Adam Twiss, Zeus Technology Ltd, http://www.zeustech.net/
Licensed to The Apache Software Foundation, http://www.apache.org/

Benchmarking easypay.ctgkube.com (be patient)
Completed 10000 requests
Completed 20000 requests
Completed 30000 requests
Completed 40000 requests
Completed 50000 requests
Completed 60000 requests
Completed 70000 requests
Completed 80000 requests
Completed 90000 requests
Completed 100000 requests
Finished 100000 requests


Server Software:
Server Hostname:        easypay.ctgkube.com
Server Port:            80

Document Path:          /payments
Document Length:        340 bytes

Concurrency Level:      1000
Time taken for tests:   212.537 seconds
Complete requests:      100000
Failed requests:        76
   (Connect: 0, Receive: 0, Length: 76, Exceptions: 0)
Total transferred:      49964000 bytes
HTML transferred:       33975520 bytes
Requests per second:    470.51 [#/sec] (mean)
Time per request:       2125.374 [ms] (mean)
Time per request:       2.125 [ms] (mean, across all concurrent requests)
Transfer rate:          229.57 [Kbytes/sec] received

Connection Times (ms)
              min  mean[+/-sd] median   max
Connect:        0  630 1540.3    208   65609
Processing:    95  897 2306.1    254   99451
Waiting:        0  834 1647.1    248   99451
Total:        189 1527 2762.2    865  100599

Percentage of the requests served within a certain time (ms)
  50%    865
  66%   1395
  75%   1519
  80%   1884
  90%   3392
  95%   4694
  98%   7501
  99%  10187
 100%  100599 (longest request)
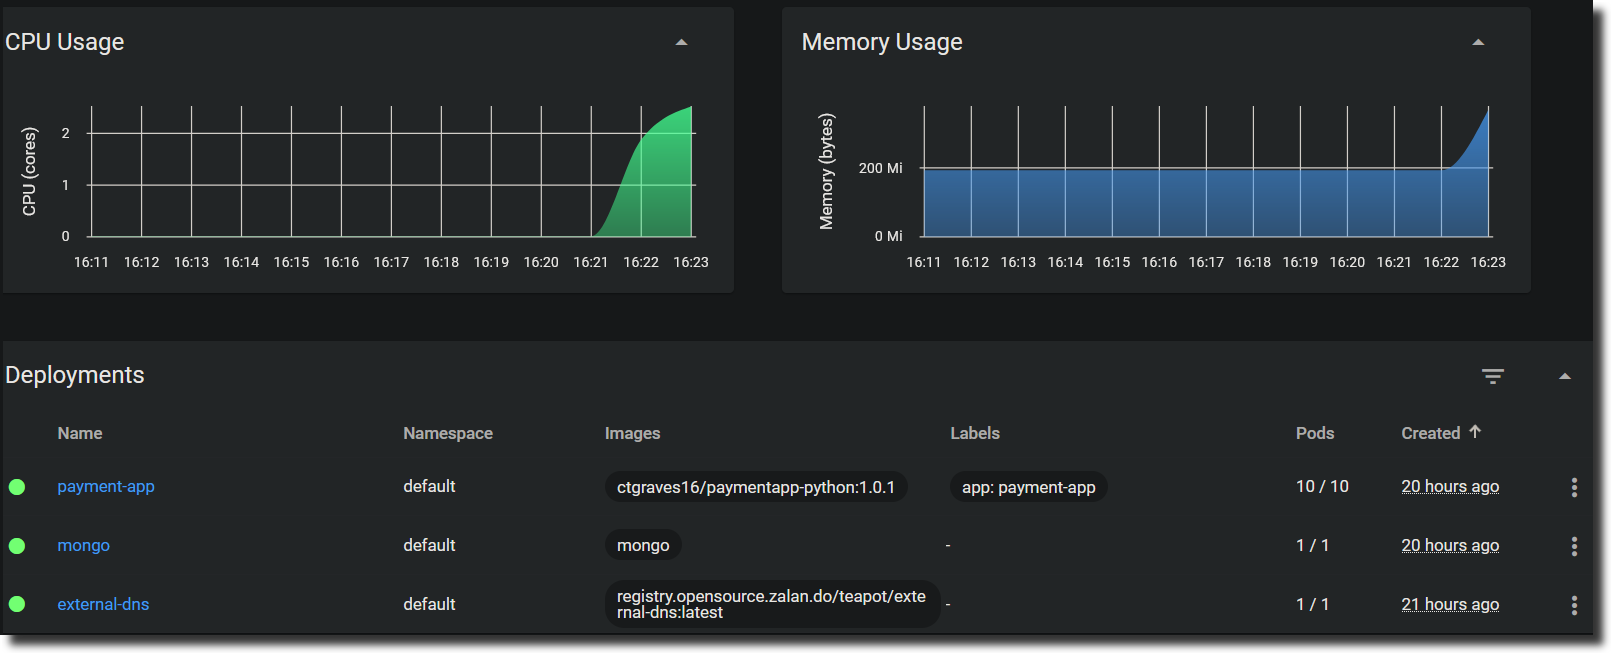
The auto-scaling functionality, as we can see, was successful once Apache bench completed all the requests. The kubectl get hpa -w command monitors the performance of the cluster deployments in real time. The replica set went from 3 payment-app pods running in service to 10 to handle a 500% or higher CPU utilization, which exceeds the 50% threshold. Once the load decreases, the replica set will scale back down to its orginal state of 3.
$ kubectl get hpa -w
NAME              REFERENCE                TARGETS   MINPODS   MAXPODS   REPLICAS   AGE
payment-app-hpa   Deployment/payment-app   1%/50%    3         10        3          4d4h
payment-app-hpa   Deployment/payment-app   559%/50%   3         10        3          4d4h
payment-app-hpa   Deployment/payment-app   559%/50%   3         10        6          4d4h
payment-app-hpa   Deployment/payment-app   559%/50%   3         10        10         4d4h
payment-app-hpa   Deployment/payment-app   247%/50%   3         10        10         4d4h
payment-app-hpa   Deployment/payment-app   1%/50%     3         10        10         4d4h
payment-app-hpa   Deployment/payment-app   1%/50%     3         10        10         4d5h
payment-app-hpa   Deployment/payment-app   1%/50%     3         10        3          4d5h

$ kubectl top pods --use-protocol-buffers
NAME                            CPU(cores)   MEMORY(bytes)
external-dns-7ff5ccbb48-p8wdd   1m           17Mi
mongo-786f4cb565-dr62t          129m         97Mi
payment-app-767748b689-2r54p    170m         24Mi
payment-app-767748b689-46hzw    169m         25Mi
payment-app-767748b689-4vl9t    177m         31Mi
payment-app-767748b689-6vbhw    174m         25Mi
payment-app-767748b689-g6l7c    180m         25Mi
payment-app-767748b689-pkwnz    177m         31Mi
payment-app-767748b689-q6b7l    170m         24Mi
payment-app-767748b689-s42wl    173m         25Mi
payment-app-767748b689-sjwm2    170m         24Mi
payment-app-767748b689-xkpct    180m         25Mi

$ kubectl get pods
NAME                            READY   STATUS    RESTARTS   AGE
external-dns-7ff5ccbb48-p8wdd   1/1     Running   0          20h
mongo-786f4cb565-dr62t          1/1     Running   0          20h
payment-app-767748b689-2r54p    1/1     Running   0          77s
payment-app-767748b689-46hzw    1/1     Running   0          92s
payment-app-767748b689-4vl9t    1/1     Running   0          49m
payment-app-767748b689-6vbhw    1/1     Running   0          48m
payment-app-767748b689-g6l7c    1/1     Running   0          92s
payment-app-767748b689-pkwnz    1/1     Running   0          48m
payment-app-767748b689-q6b7l    1/1     Running   0          77s
payment-app-767748b689-s42wl    1/1     Running   0          92s
payment-app-767748b689-sjwm2    1/1     Running   0          77s
payment-app-767748b689-xkpct    1/1     Running   0          77s
Conclusion
Wow, this was quite a project! If you made it this far, congratulations! You have a fully capable microservices application deployed to a Highly Available Kubernetes cluster 👏🏾
If you enjoyed this project or have any other suggestions, leave a comment below. Your feedback is always welcome.